
Recently a paper I submitted on one of my research projects was conditionally accepted to ISMAR23. While this is great news, it’s also a great motivator to finally get around to open-sourcing the project (like I claimed we would in the paper). I didn’t have a great idea where to start, and the prospect of flubbing something legal related is always intimidating (I had a COVID-era hobby project living in limbo for the same reason). So here we go, a rough outline of what you need to do for people like me who don’t give a damn about the money and dread the arrival of the overly commercialized Web 4.0 internet.
Steps
- Add more comments and documentation (yours aren’t good enough yet)
- Make your README actually read-able
- Get things reproducable
- Make a fresh copy and make sure your project still compiles/builds/works
- Choose a license
- Actually add your license to your project
- Check the licenses of any code/packages you used in your project
- Add contributing guidelines/code of conduct
- Make your code available
- Pour a drink
Add more comments and documentation (yours aren’t good enough yet)
Depending on the scope of your project, you may have started off great with your docs, but likely you lost control of things. That’s normal, no problem. It’s time to buckle down and correct the problem as best as you can. At the minimum, at least identify the areas which would most likely confuse others and make a mental note of them for the next step.
Make your README actually read-able
Your README is your primary form of communication with those who will be using or building off your project. If you’re gonna half-ass it, might as well just abandon this whole idea altogether. Most of the time when you load up a project on GitHub or download some sketchy software online, it’ll come with a README, README.txt, or README.md. On GitHub, that file is read and is what is displayed to you when you scroll down past the file structure at the top of the page.
I’ve looked at billions of these files over the years, but how they’re structured was never really something I payed attention to. Luckily a quick Google search led me to https://www.makeareadme.com/ and I compared its thoughts to some projects I already had downloaded. It’s a solid outline.
Now there are a few typical file formats you see with READMEs, but they all revolve around the same concept. Delivering raw, relatively software-independent text to the user. I recommend doing a .md (aka Markdown) file. Markdown files are an alternative to plain text documents that allow for a little more swag. Essentially somewhere between a more universally acceptable Word document and a LaTeX project. This allows it to be easily displayable, like you see on a GitHub repository.
Luckily, you won’t need to learn an entire new language to write these (NOT like LaTeX), as the editors for it do 99% of the work. You’ve got a million options (hell, you can do it directly on GitHub with a live preview), but I recommend Haroopad. It appears to be semi-abandoned, but it has amazing tools that add all the difficult stuff and leave you to just select what you want (list, image, headers, links, etc.) and fill in the empty spots with your text. The Windows 7 installer they provide still works as expected on my Windows 10 machine, but I can’t speak for the other versions. Other popular options seem to be Typora (has a one-time fee, but allegedly worth the money) and Obsidian (looks like much more of a powerful IDE-style editor).
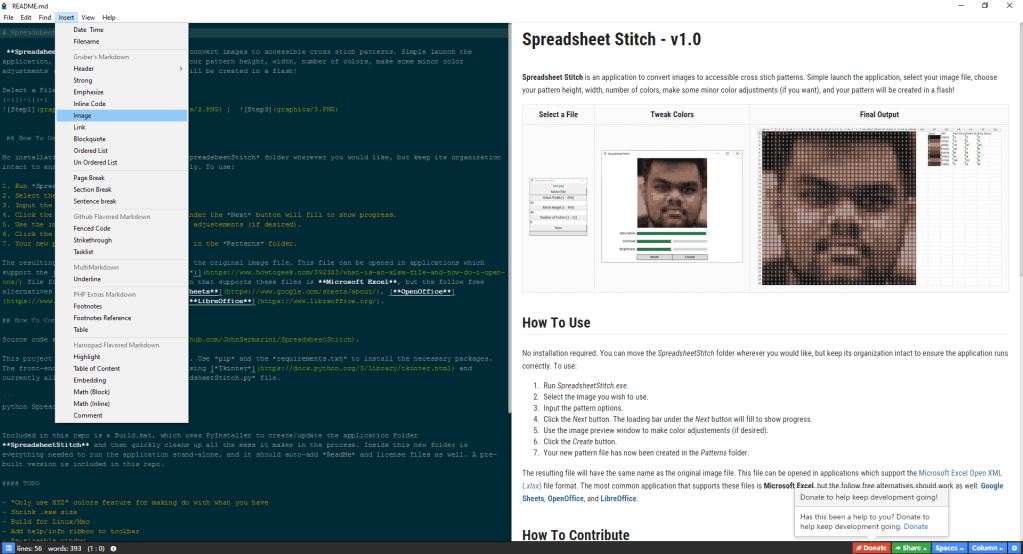
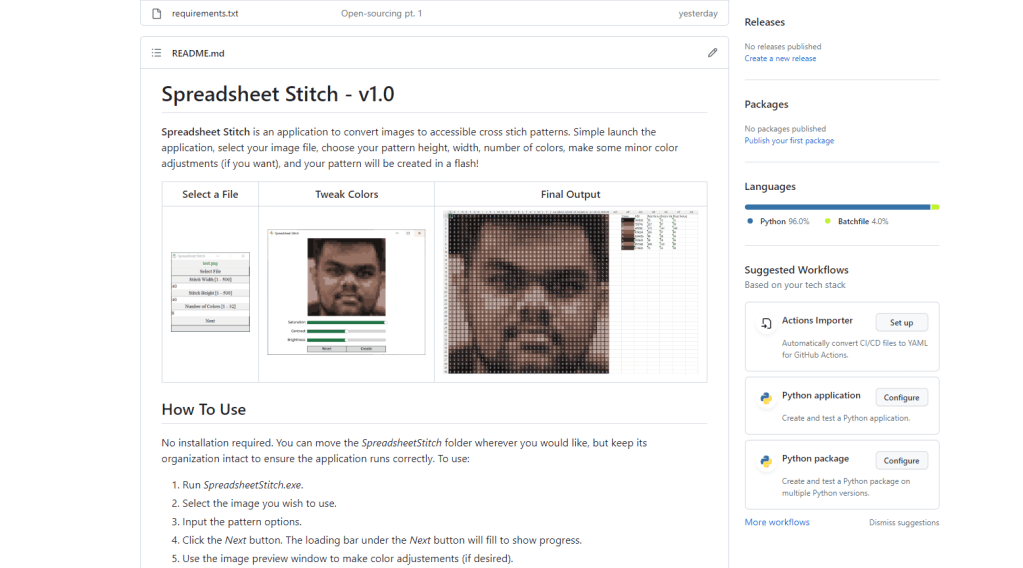
For format, I like a nice simple structure. Title and description at the top, followed by a teaser image, then additional sections describing the layout of the repo, how to install the application, how to develop for the application, and then whatever else you need. You can see an example of that in the image below or view some Markdown code on the following links: [1] and [2]. Enjoy the process, get creative.
Get things reproducable
Update your readme and other documentation to address any judgment calls that your users/developers would have to make BEFORE they have to make them. Note the version numbers and requirements for any software that your project is reliant on, even if that software is included in the project repository. Next, make sure your software and environments are properly updated. For example, if you’re using Python, make sure your requirements file has been updated so your virtual environment can be easily recreated.
Make a fresh copy and make sure your project still compiles/builds/works
If you’re feeling confident about the reproducibility of your development environment, it’s still always a good idea to make a fresh build of your project to be sure. If you’re using Git, make a fresh clone of the latest version of the project and try re-configuring the project according to your README. If anything goes wrong, loop back around to Step 1.
Choose a license
For me, the most intimidating part of this process is selecting the license that your code is made available under. I found https://choosealicense.com/ and its license list to be a great starting point. FOSSA categorized these types pretty succinctly as: copy-left (classic 90’s PC terrible pun) or permissive. All licenses have their own specific quirks, but the general summary is that copy-left licenses require that future code that uses or builds off that code remain publicly available, while permissive licenses are far more lax. The license list includes some of the most popular licenses I see around, and they’re ordered from the most restrictive copy-left style (top of the list) to the least restrictive permissive (bottom of the list).
For my personal work so far, I’ve gone with the MIT License because of its non-restrictive simplicity. Basically, this just requires those who use my code to include my notice (either somewhere in the repo, or in the comments in my script) in their codebase. This approach may not work for everyone though, as I don’t care about others re-packaging or selling my work at all. For our academic work, we chose the Apache 2.0 License because it’s similar to the MIT, but a little more restrictive.
Actually add your license to your project
Now you’ll need to add in the actual license to your repository/code. If you’re using GitHub, they have an extremely easy process for creating and adding a license file all on their online interface. Even if you’re not using GitHub, this link will still outline all that you need to do with your code. With most licenses, this is as easy as creating an empty file named LICENSE, LICENSE.txt, or something similar, and then pasting your license into that file. For example, I mentioned the MIT License earlier, and all that needed was a slightly modified (edit in my own name and the current year) base MIT License file. You may also want to add your license to the top of your code as a comment if it’s not too distracting.
Check the licenses of any code/packages you used in your project
Before uploading anything, make sure that your project is properly following the licenses of any other code you may have integrated. While this usually isn’t a problem if you’re making note of other project’s availability as you add them, its still a good idea to asses your project at the end and double-check everything. If you’re including source-code form other projects, make sure to include their appropriate license files as well. If you’ve included code that’s under a copy-left style license, update your own license and availability appropriately.
Add contributing guidelines/code of conduct
The last major step is adding a couple more files that advise other developers on how to contribute to this project and what the code of conduct that governs these contributions is. These are typically two extra Markdown files in the base of your codebase titled CONTRIBUTING.md and CODE_OF_CONDUCT.md. I don’t have great input to provide here, so I defer to Section 3 of this excellent guide.
Make your code available
If you’re ready to roll, it’s time to make your project publicly available. If you’re project is privatly hosted or offline, I recommend GitHub as a great outlet for hosting it, and this quick guide will introduce you to the basics of using GitHub. For those unfamiliar with Git, you should probably start here instead, as this software is the basis for making changes to projects hosted on GitHub. For those already using GitHub, you can convert any private project to a public one by following this guide. After this, your project should be available, and don’t forget to post about it to whatever social media you prefer to start driving traffic to your hard work!
Pour a drink
You deserve it buddy.
